Planning a trip to the Dolomites without renting a car?
In this guide, I share my 7-day hiking itinerary across the Dolomites—covering iconic spots like Tre Cime, Lago di Braies, Seceda, and the Vajolet Towers—using only public transportation.
If you’re looking for a realistic, efficient route that balances must-see highlights with manageable logistics, this itinerary is designed exactly for that.
- No car required
- Covers major highlights
- Based on real experience (July trip)
- Balanced for both scenery and feasibility
Overview: 7-Day Dolomites Itinerary
| Day | Area | Highlights | Base |
|---|---|---|---|
| Day 0 | Arrival | Innsbruck → Bruneck | Bruneck |
| Day 1 | Tre Cime | Tre Cime loop + Cadini viewpoint | Bruneck |
| Day 2 | Lago di Braies | Lake + Croda del Becco hike | Bruneck |
| Day 3 | Lago di Anterselva | Relaxed lake walk | Bruneck |
| Day 4 | Transfer | Move to Bolzano | Bolzano |
| Day 5 | Seceda | Iconic ridgeline views | Bolzano |
| Day 6 | Renon | Earth pyramids hike | Bolzano |
| Day 7 | Catinaccio | Vajolet Towers hike | Bolzano |
Who This Itinerary Is For
This itinerary is ideal if you:
- Want to explore the Dolomites without renting a car
- Have around 7 days for your trip
- Enjoy hiking but don’t necessarily want extreme alpine routes every day
- Prefer a mix of iconic views and quieter nature spots
Key Travel Tips (Before You Go)
- Book buses (e.g., Tre Cime access) in advance during peak season
- Check last bus times carefully—some routes end early
- Consider staying in Bruneck (north) and Bolzano (west) as bases
- Use accommodation guest passes where available for free transport
Now, let’s dive into the day-by-day itinerary.
First Half: Northern Dolomites
For the first four days, I based myself in Bruneck/Brunico, a town near the Austrian border, and explored the northern Dolomites from there.
*In South Tyrol, where the Dolomites are located, place names are often shown in both German and Italian.
For example: Bruneck (German) / Brunico (Italian)
It can be confusing at first, but understanding both names will help avoid confusion later on.
I chose this route because I flew into Innsbruck.
Innsbruck, located in western Austria, is also a well-known hub for mountain enthusiasts.
From there, the Dolomites are just a few hours away by train. I’ve always liked Innsbruck, but what really drew me was the idea of traveling through the South Tyrol mountains by train—so I decided to enter the Dolomites this way.
Day 0: Travel Day – To Bruneck
After arriving at Innsbruck Airport around midday, I took a 20-minute bus ride into the city to reach Innsbruck station.
From there, I headed to Bruneck by train.
First, take the ÖBB Railjet to Fortezza/Franzensfeste (about 1h20), then transfer to a regional train (No.1877) and get off at Bruneck (about 30 minutes).
You can buy train tickets last minute, but during peak season (especially summer), trains can be crowded and seat reservations may not be available—so it’s best to book in advance.
You can purchase tickets online via the ÖBB website.
*Note: Due to construction, the train between Fortezza and Bruneck is suspended until December 2025.
Instead, buses run from Bressanone/Brixen, so you’ll need to route via Bressanone instead of Fortezza.
Bruneck is a great base—it has plenty of restaurants and supermarkets, and public transport runs frequently, making it easy to get around.
The place I stayed at was also run by very kind hosts, so I’d definitely recommend it:
Residence Haus Ragen
https://www.booking.com/hotel/it/residence-haus-ragen.en-gb.html
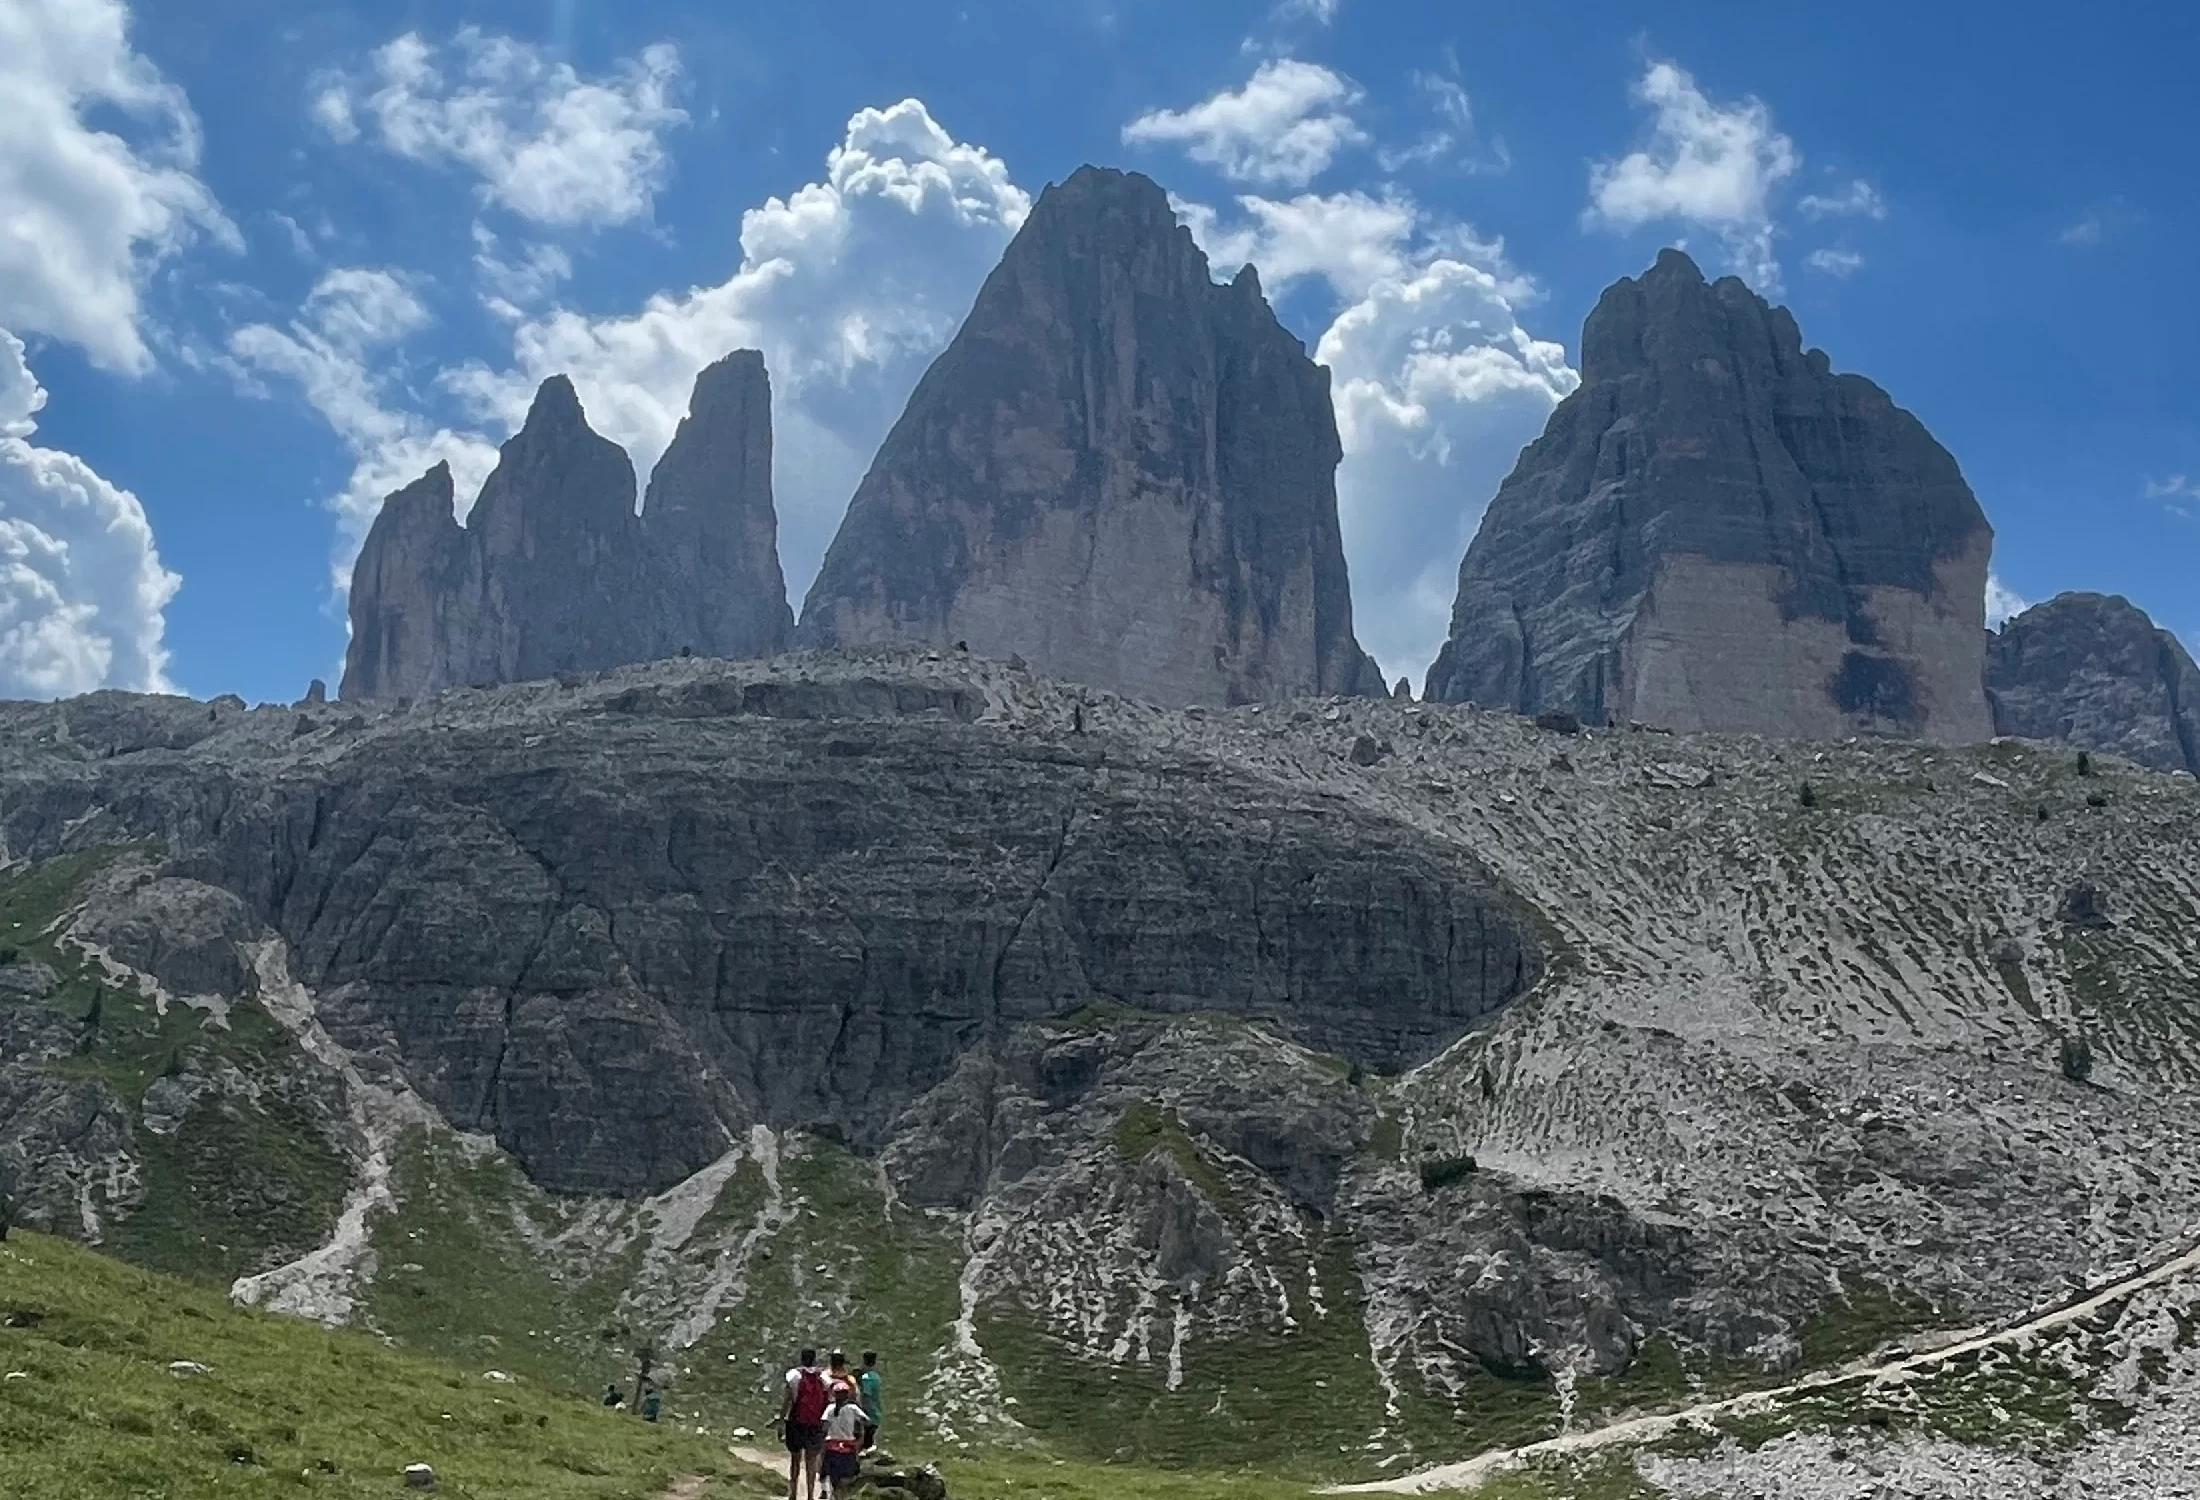
Day 1: Tre Cime
For the first hiking day, I chose something relatively easy and walked around the Tre Cime area.
From Bruneck, take a train (~30 minutes) to Dobbiaco/Toblach, then transfer to bus 444 (~50 minutes) to reach Rifugio Auronzo, the trailhead.
*Bus 444 runs only from mid-June to September, so be careful if traveling outside this period.
Also, it gets very crowded during peak season—book your ticket in advance.
I didn’t know this and couldn’t board my planned bus, but luckily got a seat on the next one.
Traffic was heavy near Tre Cime, but buses can use a dedicated lane—so in this case, taking the bus was actually more efficient than driving.
First, I visited the viewpoint overlooking the Cadini di Misurina range.
It’s about a 1.5km walk from the hut, and definitely worth adding to your plan.

The trail wasn’t too steep, but there were narrow cliffside sections that felt quite exposed—so it’s important to stay focused.
It’s also a popular photo spot, often with a queue, so arriving early is recommended.
After returning to the start, I walked the loop around Tre Cime.
It’s about 10km, mostly flat with some gentle elevation, and many people were walking it casually.
Being able to see Tre Cime from every angle—and the wide-open views along the way—made it a really enjoyable and scenic walk.

Day 2: Lago di Braies & Croda del Becco
On the second day, I took on a route starting from the famous Lago di Braies, passing Malga Foresta and Rifugio Biella, and hiking up to Croda del Becco.
To get to Lago di Braies, take a train from Bruneck to Niederdorf/Villabassa (~30 minutes), then transfer to bus 442 (~20 minutes).
*In South Tyrol, there is a guest pass that allows you to use public transportation for free, which is sometimes provided by your accommodation.
You can check participating accommodations and coverage details on the official website below:
https://www.suedtirol.info/en/en/information/suedtirol-guest-pass
Lago di Braies is a very popular tourist destination, and there are accommodations nearby, so it was already quite busy in the morning.
Luckily, the weather was perfect, and I was able to see the lake’s beautiful emerald-green color.

First, I walked along the lake before heading up toward Malga Foresta.
About 1km from the start, you’ll reach a junction where the trail turns into the mountains. From there, a gentle uphill continues, and after around 1.5km, the hut comes into view.

Before reaching the hut, take the trail on the left.
This section includes rocky terrain near streams and some loose gravel, so footing can be unstable in places.

As you climb higher, the scenery gradually changes—from forest to open alpine views.
Although the ascent can be tough at times, taking breaks made it manageable.
After about 7km, you’ll reach Rifugio Biella.
From there, it’s another 1.5km and 470m of elevation gain to the summit of Croda del Becco.

From the summit, you can look down over Lago di Braies and enjoy panoramic views of the Dolomites—making the effort completely worthwhile.
This 18.5km route with 1,600m elevation gain may not be beginner-friendly, but Lago di Braies is definitely a must-visit when traveling in the Dolomites.
*If you plan to hike all the way to Croda del Becco, make sure to check the return bus schedule in advance, as the last bus leaves in the late afternoon.
Day 3: Lago di Anterselva
On this day, I visited Lago di Anterselva, which was recommended by my host.
It’s less crowded than Lago di Braies, and apparently more popular among locals.
It’s also easily accessible—about 45 minutes from Bruneck by bus 431.
The lake is similar in size to Lago di Braies, and it takes about an hour to walk around it.
The color here is more turquoise, and equally beautiful.

There were also benches for relaxing and sunbathing, making it a great place to slow down and enjoy the scenery.
Interestingly, this area is being used as a venue for the biathlon events at the 2026 Winter Olympics, and construction was underway when I visited in July 2024.
Second Half: Western Dolomites (Seceda & Catinaccio)
Day 4: Travel Day – To Bolzano
From Bruneck, take a train to Bressanone (~50 minutes), then transfer and continue to Bolzano (~30 minutes).
Bolzano is a larger city compared to Bruneck, with many shops, restaurants, and a lively atmosphere.

I especially liked how colorful the buildings were, and how you could see mountains from almost every street.

And of course—you can enjoy great Italian food here.

Day 5: Seceda
On the first day in the western Dolomites, I headed to Seceda—one of the most iconic viewpoints in the region. The view of Gran Fermeda and the Geisler/Odle range from the top is truly unforgettable.
From Bolzano, take bus 350 for about 1 hour to Ortisei (Urtijëi). From there, it’s about a 10-minute walk to the cable car station, which takes you up close to the summit.
*During peak season, the cable car can get very busy, so it’s best to book tickets in advance.
Online: https://www.seceda.it/en/tickets
Even the cable car ride itself offers beautiful views.

After getting off, a short 5-minute uphill walk leads you to the famous viewpoint.

The scenery here is truly one of a kind—absolutely breathtaking.
I chose a loop route starting and ending at Seceda, passing through Pieralongia, Rifugio Firenze, and Troier huts.
From the viewpoint, walk about 2km with Gran Fermeda on your left to reach Malga Pieralongia. The trail is mostly flat with gentle ups and downs.
This area near Seceda can be crowded, but once you move further along, it becomes much quieter and more peaceful.

After about 1.7km past the hut, turn right at a junction and continue another 2km downhill to Rifugio Firenze.
From here, you’ll get a beautiful view of Furchetta.
The return to Seceda involves a steady 3.5km climb. There are several trail splits, but passing via Troier hut will bring you back toward the cable car station.
There are many more hiking routes in the Puez-Odle area, so if you visit Seceda, it’s worth exploring beyond just the main viewpoint.
Day 6: Renon Earth Pyramids
On this day, I visited the Renon Earth Pyramids, which I heard are a “local specialty” of Bolzano.
Start by taking the cable car from near Bolzano station to Soprabolzano.
The views over the city from the cable car are also worth enjoying.

From the cable car station, I followed a 6.4km hiking route passing through the Earth Pyramids.
The trail begins by walking along a road near the railway line before looping back through meadows and forest.

After about 2.5km, you’ll find signs pointing toward the Earth Pyramids.

These unique formations were created by erosion during glacial retreat.
It’s an easy and relaxing hike, perfect for a slower sightseeing day in Bolzano.
Day 7: Vajolet Towers
On the final day, I hiked in the Catinaccio (Rosengarten) group to see the iconic Vajolet Towers.
From Bolzano, take bus 180 to Vigo di Fassa (~1 hour 10 minutes).
Along the way, you’ll pass the beautiful Lago di Carezza.

From Vigo di Fassa, take a cable car up to Ciampedie.
*Tickets can be purchased in advance:
https://www.fassa.com/en/ski-lifts-slopes/summer-lifts
From the top, the trail starts with a gentle walk through forest, passing Rifugio Ciampedie and Rifugio Negritella.
After about 3km, you’ll reach Rifugio Gardeccia.

From here, continue uphill for about 2km toward Rifugio Vajolet.

The final 300m climb is steeper, but manageable.

From there, I continued to Rifugio Re Alberto (another 1km). This section is steeper and includes rocky terrain, so it may not be suitable for beginners.


After a short break, I carefully made my way back down.
Also, the apple strudel at Rifugio Vajolet was amazing—highly recommended.

Even if you don’t go all the way to Rifugio Re Alberto, the trail up to Rifugio Vajolet already offers incredible views and is well worth adding to your itinerary.
Conclusion
The Dolomites cover a vast area with countless hiking routes and activities, which can make planning a short trip feel overwhelming.
However, by focusing on key highlights and planning efficiently, it’s absolutely possible to explore multiple iconic spots within about a week.
By choosing routes that match your level, you can fully enjoy the experience without overexerting yourself.
If you’re looking for your next travel destination, the Dolomites should definitely be on your list.